The Illustrated Appium Tutorial For Beginners

We created this Appium Tutorial For Beginners to show QA engineers how to use Appium for mobile test automation. What is Appium?
Appium is an open-source mobile test automation tool, created by Dan Cuellar and then developed by Sauce Labs. It was created to let users automate native and hybrid Android and iOS mobile apps. You can write Appium tests using your favorite programming language (Objective-C, Ruby, PHP, C# and Java) and development platform tools.
Why Appium? What are the benefits of Appium?
In our Appium Tutorial for mobile testing, we will guide you through eight simple steps to help you get started and be able to fully leverage this automation tool. So why Appium? What are the benefits of using Appium?
- on the API level, Appium allows tests to be written for multiple mobile platforms using the same API
- allows tests to be written with preferred programming languages. There is no need to learn additional language to work with Appium
- is based on Selenium Web Driver which has become a de-facto standard in Web app testing, so if you know Selenium, it’s easy to switch to Appium
- user-friendly, easy to learn
- supports distributed tests via Selenium Grid
- easy to use with CI such as Jenkins
- cross-platform. Works on Mac, Windows and Linux
What is Appium? How does it work?

Appium is an HTTP server which uses JSON Wire Protocol to interact with tests. While your test application is running, it sends commands to Appium which transforms these to UI Automation JavaScript for iOS or UIAutomator Java commands for Android respectively.
The responses obtained from mobile applications are received by native automation tools such as Android UIAutomator. Appium converts them back into WebDriver JSON Wire Protocol format and sends the JSON responses back to your test application. It sounds pretty complex, but HTTP requests do not have to be written manually – all ‘dirty’ work is done by Appium client framework for the language of choice. Its great performance is thanks to the JSON Wire protocol that Appium customers use to interact with mobile devices via the Appium Server. Let’s see how to work with Appium step by step.
Step №1. How to Install Appium
In order to install Appium you need either a Mac or a PC with MacOS, Windows or Linux installed and then follow the installation instructions. To install Android Studio you need to go to https://developer.android.com/studio/index.html and install Android Studio. We will use Java and InteliJ Idea running on OSX 10.10 to show how simple it is to setup Appium and write Appium tests to test ApiDemos sample bundled with the Android SDK platform and Android SDK tools.
Step №2. How To Check your System Configuration
First, download Appium, launch the Appium Desktop application and run Appium Doctor by clicking the button highlighted below. We use version 1.4.8 which is the latest version available at the time of writing this article.
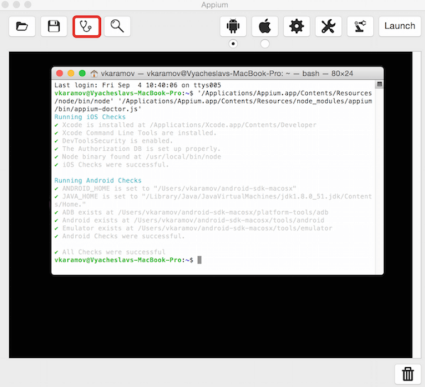
It opens the Terminal window which should look the same as above. If you have any errors, try to make the added environment variables in ~/.bash_profile available to UI Apps such as Appium Desktop application:
function export () { builtin export "$@" if [ [ $ {# @ } - eq 1 & amp;amp; & amp;amp; "${@//[^=]/}" ] ] then launchctl setenv "${@%%=*}" "${@#*=}" elif[[!"${@//[^ ]/}"]] then launchctl setenv "${@}" "${!@}" fi } export -f export export ANDROID_HOME = $HOME / android - sdk - macosx export JAVA_HOME = $(/usr/libexec / java_home) If you don’t see any errors in the Terminal window, get full source code, for example, tests for this article and to ‘app’ folder. This is the application we are going to test. Configure Appium first in order to run this app:
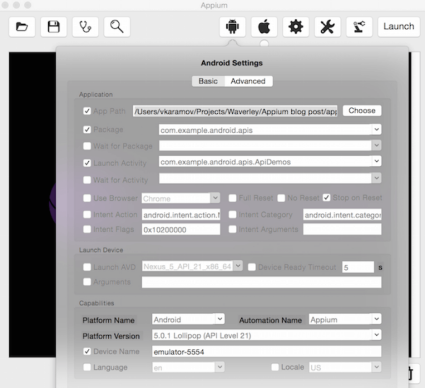
Fill in the following fields:
- App Path – Path to the (*.apk, *.zip) of mobile apps we are going to test.
- Package
- Launch Activity
- Mobile device name – Name of the real mobile device or Android Emulator in use. To choose it, type ‘adb devices’ command in the Terminal App and copy the desired device’s name
- Launch AVD – Name of Android virtual device. If this checkbox is marked, Appium will launch Android emulator before testing.
Step №3. How to Inspect the Mobile App UI
Click the ‘Launch’ button, wait a few seconds and then click the button with the magnifier icon to launch the mobile apps on a selected device or emulator. The Appium Inspector window will pop up after clicking the magnifier icon. There you can inspect the app’s UI elements. The Appium Inspector enables a functionality host, in particular:
- Shows all mobile apps elements
- Shows resource-id, class name, XPath and other attributes needed to write tests
- Enables recording and playback of user actions
When you see Appium Inspector and mobile app launched it means that everything is configured correctly and we can start with writing our first test.
Step №4. How to Create a New Test Project
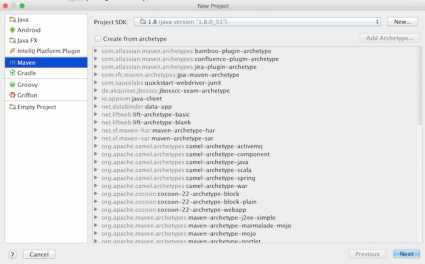
Launch InteliJIdea, go to ‘File→New→Project…’, select ‘Maven’ (note that Maven and JDK should be installed) and then click Next.
Fill in the GroupId, ArtifactId and Version with whatever you wish. You could change them later if necessary. Locate your project file and edit, so that it looks like this one.
Step №5. How to Write Your First Test
Open ‘View→ Tool Windows → Project’ to see the Project’s tree, delete the ‘main’ folder (it’s not obligatory) entirely and create a package waverley.util under src/test/java. Create an AppiumTest class. The key method here is setUp() where we provide so-called “desired capabilities”, required for the driver initialization. The capabilities should match the options we’ve set in the Appium desktop app.:
@Before public void setUp() throws Exception { DesiredCapabilities capabilities = new DesiredCapabilities(); capabilities.setCapability("appium-version", "1.4.8"); capabilities.setCapability("platformName", "Android"); capabilities.setCapability("deviceName", "Android"); capabilities.setCapability("platformVersion", "4.0"); mDriver = new AndroidDriver(new URL("http://127.0.0.1:4723/wd/hub"), capabilities); Helpers.init(mDriver); }In the next step let’s make the waverley.util.Helpers class where we implement all the boilerplate code needed for our tests.
In the init() we set the amount of time the Appium Driver would search for the element. You may want to make it higher than 30 seconds, depending on your hardware or test logic. The next thing we need to add is the ability to search for an element using the given strategy.
public static MobileElement element(By locator) { WebElement webElement = mDriver.findElement(locator); return w(webElement); } The search strategy is called the Locator and is implemented by org.openqa.selenium and io.appium.java_client.MobileBy classes. So, which strategies are available? By:
- iOS UIAutomation or Android UIAutomator test scripts
- Accessibility Id
- name
- resource id
- class name, for example, android.widget.TextView
- XPath
The last one is the easiest and at the same time the slowest strategy. Many novice automation engineers often overuse this technique and get unsatisfactory software testing performance. So we’d better write our first test using the XPath search strategy. We should create a new public class waverley.AppTest and the testing method for it:
public class AppTest extends AppiumTest { @Test public void testXPath() throws Exception { String text = Helpers.element(By.xpath("//android.view.View[1]" + "/android.widget.FrameLayout[2]/android.widget.ListView[1]" + "/android.widget.TextView[3]")).getText(); assertEquals("App", text); } } Instead of calling Helpers.element(locator).getText(), we could also create a wrapper: getText(locator), which internally does driver.findElement(el).getText(), which might be simpler.
Here we should annotate our class by @Test annotation to let Java test framework know that it should recognise testXPath() as a test and call it whenever tests are executed.
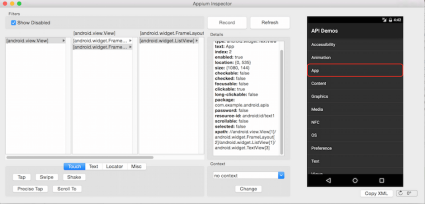
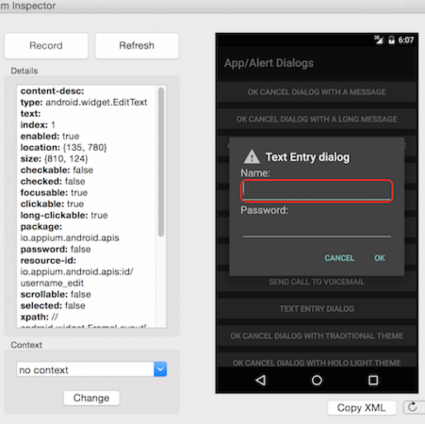
Please look at the Appium Inspector screenshot above. On the right we have the application’s main screen, called the Main Activity among Android developers. The “App” cell is selected. It can be reached by so called XPath. You can find out any element’s XPath by selecting it in the Inspector and looking at the “Details” list.
Now please recall what we do in Helpers.element() – we ask the driver to find the element in the current Activity using the given strategy. Here we create the XPath strategy
By.xpath("//android.view.View[1]/android.widget....")After this review the element and check the text it displays.
String text = Helpers.element(...).getText();
We expect this text to be “App” otherwise something might go wrong:
assertEquals("App", text);That’s it. Simple, isn’t it? 🙂
Step №6. How to Make Things Faster
The former test could be written effortlessly with almost no knowledge of Java development, just by clicking the “Record” button in the Appium Inspector. It sounds great, but in practice you don’t have to use the XPath strategy in such a straightforward way. We’ll get back to it later. Now we want to show you how to find the element by its resource Id.
Add one more test method:
@Test public void testId() throws Exception { // Find android.widget.ListView by its ResourceId MobileElement element = Helpers.element(By.id("android:id/list")); // Then find its cell (android.widget.TextView) by its contents WebElement appElement = element.findElementByName("App"); // Compare cell's content with expected value i.e. "App" String text = appElement.getText(); assertEquals("App", text); } How to find the element’s resource id? Recall “resource-id” field in the “Details” list of the Appium Inspector.
Step №7. How to Add Interactivity
Add one more test method:
// AppTest.java @Test public void testNavigation() throws Exception { MobileElement element = Helpers.findByResourceId("android:id/list"); WebElement appElement = element.findElementByName("App"); appElement.click(); Helpers.swipe(element, SwipeDirection.UP, 500); Thread.sleep(1000); // Scroll to the very first cell containing element with the exact text Helpers.scrollToExact("Fragment"); } // Helpers.java public static void swipe(MobileElement element, SwipeDirection direction, int duration) { direction.swipe(mDriver, element, duration); } public static void back() { mDriver.navigate().back(); } Here you see the “App” cell, click it. Next we scroll the list up, wait 1000 milliseconds and scroll to the cell containing the word “Fragment”. Looks very simple, but you might wonder: “Why don’t we use io.appium.java_client.SwipeElementDirection.swipe() instead of implementing our own method?”. The answer is: because programs contain bugs and the current Appium java client is no exception. Add the following enum to the ‘util’ package:
Return to our testNavigation() test method. Insert the following code at the end:
Thread.sleep(1000); // Find frame layouts inside view List secondPage = Helpers.element(By.className("android.widget.FrameLayout")); MobileElement titleElement = (MobileElement) secondPage .get(0) .findElementByClassName("android.widget.TextView"); // Compare title with expected text, providing descriptive error message assertEquals("Title should be API Demos", "API Demos", titleElement.getText()); // Navigate back Helpers.back(); Here we find the list of frame layouts (native Android UI elements) by their class name.
Helpers.element(By.className("android.widget.FrameLayout"));Find the current View Controller’s title inside the first one, again by the title’s class name
findElementByClassName("android.widget.TextView")Then check if the title is correct and go back to the previous screen.
Helpers.back();
Step №8. How to Test the Edit Fields
Insert the following code:
// Helpers.java public static By locatorByValue(final String value) { return By.xpath("//*[@content-desc=" " + value + " " or @resource-id=" " + value + "" or @text = "" + value + ""] | //*[contains(translate(@content-desc,"" + value + "", "" + value + ""), "" + value + "") or contains(translate(@text, "" + value + "", "" + value + ""), "" + value + "") or @resource - id = "" + value + ""] "); } // AppTest.java @Test public void textFields() throws Exception { // ... final String userName = "Viacheslav Karamov"; final String password = "qwerty"; // Find the "Name" text field using a more universal, but much slower strategy MobileElement nameField = Helpers .element(Helpers.locatorByValue("io.appium.android.apis:id/username_edit")); nameField.sendKeys(userName); // Find the password field using Android UIAutomator strategy MobileElement passwordField = Helpers .element(MobileBy .AndroidUIAutomator("new UiSelector() .resourceId("io.appium.android.apis:id/password_edit") ")); passwordField.sendKeys(password); assertEquals(userName, nameField.getText()); // Fortunately we can't read passwords assertNotEquals(password, passwordField.getText()); /* Accept the alert and close the password dialog Unfortunately AppiumDriver.switchTo().alert().accept() has not been implemented yet in 1.4.8. You have to find the "Ok" button manually. */ Helpers.element(By.id("android:id/button1")).click(); } Here we break the naming convention used before and name this method without the word ‘test’ at the beginning, to show that it’s not required. However, the tests’ class name should match the patterns: “Test*”, “*Test” or “*TestCase”. So, what does this code do? It shows a simple text entry dialog you should be familiar with.
Then it finds the name and the password fields, fills them with some text and reads them again to compare with the original ones. We are not supposed to be able to read the text from the secure field. In case we can do this – it means that something went wrong. Remember how we used the XPath strategy at the beginning? Here we use it again but in a more advanced way:
By.xpath("//*[@content-desc=" " + value + "" or @resource - id = "" + value + "" or @text = "" + value + ""]; It means: “Grab the elements of any (*) class that exactly matches its Android:contentDescription (@content-desc) or resource-id (@resource-id) or text (@text) the given criteria (value)”.
Appium Tutorial : Conclusion
We sincerely hope that you enjoyed our little Appium Tutorial for Beginners and can now apply what you’ve learned in practice. Appium is a great UI-automated software testing tool for developers and QA engineers who are in love with programming and are keen on constant learning and embracing new technologies. This fast-growing open-source tool based on Selenium has already become a de-facto standard in Web app testing, so you definitely have to keep your eye on it!
About the Author