The Guide to Test Automation of ReactJS Apps

Contents:
- Introduction
- The Basics About ReactJS
- Test Automation Challenges in ReactJS
- Team Communication as a Way to Make It Simpler
- How to Deal with React Data Grid
- The Balance Between Simplicity and Versatility
- Charts Automation Principles
- Summary
Introduction
A modern Software Engineer in Test must combine the skills and mindset of a software developer, QA engineer, and DevOps engineer. The tendency for technology growth shows that in the nearest future the Engineer’s “survival” will drastically depend on the ability to evolve and adapt to the rapid IT environment changes and adopt best practices.
Being a conference speaker, I always insist that QA Engineers should learn programming languages, as well as the internals of the software they test. In this article, I’m going to dwell upon the benefits this knowledge may potentially bring for writing tests, and how it might improve the entire software testing and automation process.
But before the actual discussion about React testing, we have to define the context first. You may have already guessed that we’ll be talking about how to test React applications. React was selected because at present it’s one of the most popular libraries for building user interfaces.
Let’s start with a set of definitions in Javascript testing and then we will drill into the details of how to test React apps.
The Basics About React and React Testing
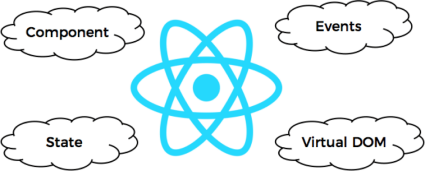
User Interface is just a tree of React components. A component is the main structural unit, which could be represented by something very small, like a button, input or label, or by something more complex, like a registration form, user profile, etc. Generally speaking, any element could be a component.
All React components are encapsulated, which means that we can’t access their internal API from the outside. Only so-called properties (or just props) can be exposed to the outer world for further manipulation.
React components may have a state. But it’s not mandatory. React supplies an out-of-the-box mechanism called local state. But unfortunately, it’s not sufficient for real-world React apps. That’s why companies providing ReactJS development services prefer using some 3rd-party libraries like Redux or MobX for more flexible state management. My further materials will be based on React + MobX chain.
The state of React components usually mutates when some events are triggered. With web applications testing, we got used to some classic mouse or keyboard events. But it’s important to note that not only UI but also back end events may affect the state of React components.
Software Engineers in Test are already familiar with Document Object Model (DOM). Especially, in the context of web automation. So what is a Virtual DOM? For now, we may think of it as of a very lightweight version of a real DOM. But if you really want to know the details, just read the official docs.
Let’s check how all these keychains work together in React.
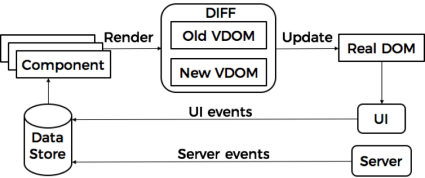
We already defined Component as the main structural unit in React. But components are usually grouped into logical modules.
A state of such modules is usually split from the components and moved into so-called Stores.
One of the primary goals of a state management tool is to track and react to the updates of the state of components. And that’s where events come into play.
Let’s imagine a classic Registration form, which could be treated as a logical module, or just as a set of components.
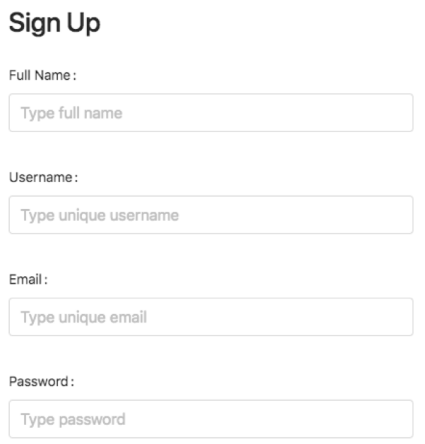
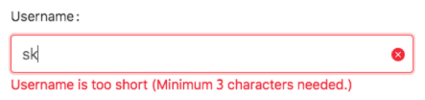
A user types something into the Username field that automatically triggers a related UI event, client validation, and as a result – the mutation of the component state.
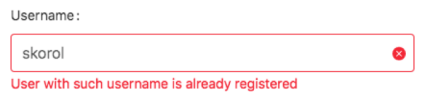
We can then push a Tab key, triggering another event – onBlur. Username verification request is sent to the backend, and again, we affect the component’s state.
So that’s a basic idea of how different events could potentially change the state of components.
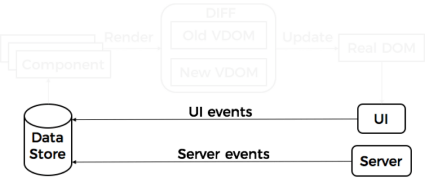
When a state management tool detects changes, a special render function is called on a component.

Note that the component is not immediately re-rendered. And that’s where Virtual DOM (VDOM) appears. When the rendering procedure is initiated, an actual component’s VDOM snapshot is taken. Then changes are applied, followed by another VDOM snapshot. When we have 2 VDOM snapshots, it’s time to check the difference between them. For that, React uses a special heuristic algorithm called reconciliation. When it finds the difference, it could be transformed into a real DOM and the final result that the user sees on UI.
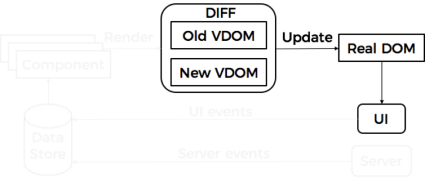
It’s important to understand this concept. It is to the VDOM that React owes the ability to build high-performance applications.
Test Automation Challenges in ReactJS
Now let’s try to determine what this knowledge means to us, QA Engineers. Well, it brings a very straightforward set of automation challenges when testing React apps (both end-to-end testing and unit tests):
- Locators lookup. Sometimes it’s quite hard to find and interact with React components. And it’s not only related to their encapsulated nature. Rendering specifics leads to the point where there could be lots of identical components located within the same page. And the main question is – how to deal with it?
- Wait context. From time to time, it’s not quite obvious what components we should wait for, and what conditions should be met before the actual interaction. A very common case in React is when we rely on some root element’s visibility, and can’t even predict that its children may constantly be updated by different events without touching their parent.
- Nodes staleness. Software Engineers writing tests for the web know what StaleElementReferenceException is. In React, you can see it often due to components’ rendering specifics. Especially, while working with a collection of WebElements.
- Events triggering. Sometimes, it’s required to interact with components directly via Javascript. Datepicker is a good example when we don’t really want to interact with its calendar via UI. Usually, API usage is the best choice, but we already know that it’s impossible to access React components’ API. So events triggering could be another option for us. As there’s no easy way to dynamically attach a required event to DOM node, represented by React component.
- Rendering frequency. VDOM concept allows UI re-rendering with a high rate. For one of the React applications we’ve built not so long ago, there was a requirement: data on UI should be updated with 4 times per sec rate. And it’s not a limit for React. So which modern automation test framework could read data from DOM with such frequency (assuming remote execution via Grid or similar solution)?
If you’re still here, and didn’t give up, thinking that React is something completely unmanageable in terms of automation, keep reading… 🙂 As of course it’s not that bad as I’ve just described.
Team Communication As a Way to Make It Simpler
Let’s see how React automation processes can be drastically simplified. You may think of some dark magic involved to make things easier. But that’s not really how it works.
The one direction you should be looking at is communication within your team. Yes, however obvious, it is very important.
I’ll give you an example of conventions we’ve built in our teams between Developers and QAs:
- If Software Engineers in Test encounter any difficulties locating or interacting with some components, they either create a Jira ticket (the preferred way) or just ask Developers directly to add a unique attribute to the target component. Let’s call this attribute data-qa. You know perfectly well that the more concise the element’s locator is, the less maintenance effort is required in the future.
- The events for React components can be triggered via a special “backdoor” called ReactTestUtils, which can be exposed on the browser level. At least for Development or Testing environment. Adding such backdoor may significantly reduce the automation effort interacting with components like Datepicker.
Is it hard to follow these conventions from the Developer’s perspective?
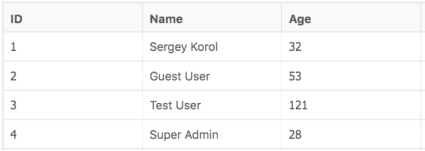
Imagine we have the following grid:
Now let’s check a DOM tree for some header / common cell:
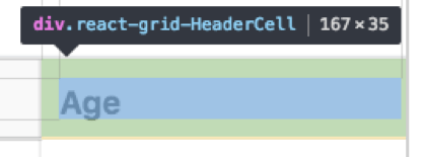
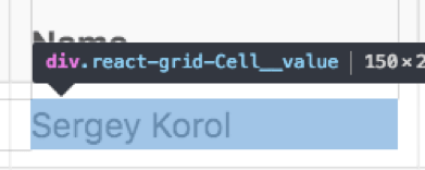
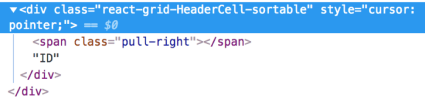
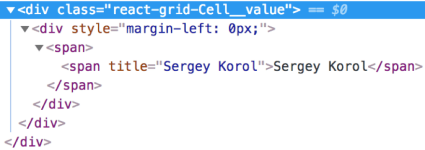
As you can see, both cells have a class attribute. But it’s useless in terms of test automation, as all other cells have exactly the same attributes. So it won’t be possible to create some flexible locators without the explicit usage of text or indexes.
Let’s see how to add a custom data-qa attribute to a Grid component.
In general, Data Grid supports custom formatter and header definitions. To override the header row and common cells’ behavior we can do the following:
.map(column => ({
            ...column,
            headerRenderer: <div data-qa={column.key}>{column.name}</div>,
            formatter: extendedFormatter(cellFormatter, { 'data-qa': `cell-${column.key}` })
        }));
Header cells are wrapped with data-qa attribute via headerRenderer. And to do the same for common cells, we can define a custom cell formatter. You can find more details in a sample Grid component’s sources.
As a result, 2 simple code lines could be transformed into the following layout:
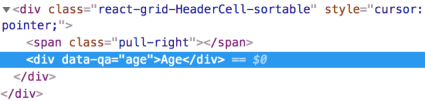
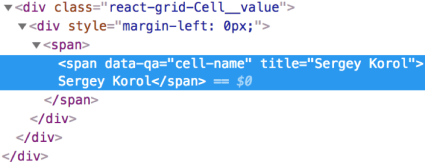
Now we can easily locate the required cells by the newly created data-qa attributes. For example, for Age column values retrieval, we can type the following:

So for the Developer, these conventions come down to adding some custom attribute. Just think of all the benefits this approach brings to Software Engineers in Test.
Ok, that’s clear. What about the events? Let’s see how it goes with the following Datepicker component.
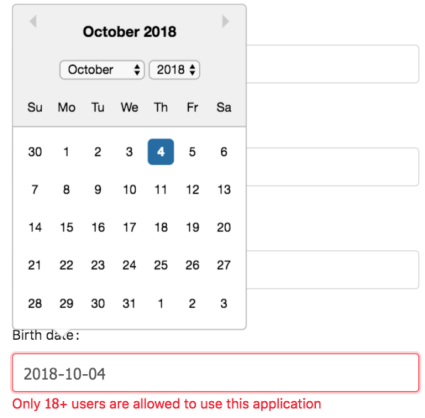
When we pick some date from a calendar, the following debug message is generated in the console log:
It notifies that onChange event is triggered to update a date value. Let’s remember this fact.
What we’re going to try next is to do the same without UI, via pure Javascript testing.
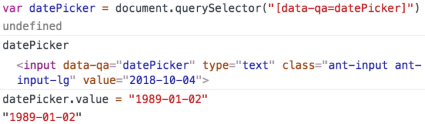
Here we locate an element via custom data-qa attribute, set a new value, and check the UI:
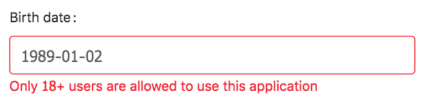
The value seems to be updated. But we still see a weird error about the user’s age. And it makes no sense as the year 1989 shouldn’t fall under the field’s restriction.
To understand what happened, let’s take a look at our schema again:
As you may have noticed, there was no debug message generated in the console log. It means that the component’s state hasn’t been mutated while setting the date directly via Javascript. As we haven’t affected the state, the component still thinks that there’s an old value present. That’s why an error message remains even with a new date.
Now we know that only onChange event triggering should update the corresponding value in a SignupStore. You may be wondering how to do that? 🙂 The answer is – ReactTestUtils. Let’s create a backdoor to see this object in a web browser.
import ReactTestUtils from 'react-dom/test-utils';

window.ReactTestUtils = ReactTestUtils;
Generally speaking, ReactTestUtils were created exactly for testing React components. So it’s a shame to ignore it for high-level UI testing. 🙂
To use it in the web browser and scripts of the Selenium testing framework we have to set its reference into a root window object.
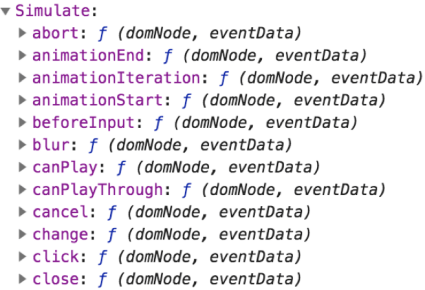
Calling it from browser console should give us the following:
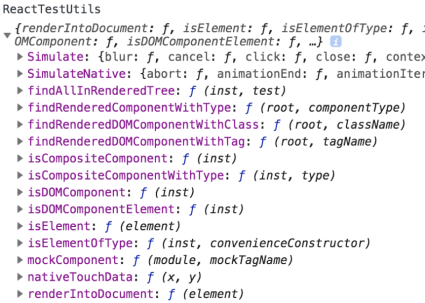
As you can see, there are lots of useful APIs to test ReactJS. But for now, we’re interested in Simulate. Let’s see what it allows us to simulate:
Events! Nice. So all we need is to call the required event and pass our DatePicker DOM node as a parameter:


Wow, that was easy! And no more errors on UI.
Bringing such kinds of conventions to the team may greatly reduce the automation effort in terms of locators lookup and their further maintenance. If we talk about complex elements automation, like DatePicker, it’s important to remember that it’s a 3rd-party component. So it makes no sense to test it. As it’s already been tested by the component’s contributors. What we really want to do is to bypass some value via internal API. And that’s where ReactTestUtils may help. But of course, you should keep in mind that it’s not recommended to backdoor it in the Production environment to avoid security risks.
How to Deal With React Data Grid
Grids testing might be quite complicated, and QA engineers usually underestimate the potential testing effort. The main problem with grids is in the amount of data and its potential permutations.
You know that exhausting testing is impossible, so one of the key QA goals is to perform data analysis first and apply special testing techniques to reduce the number of inputs. Luckily, it’s out of this topic’s scope. 🙂 We’ll pay attention to more technical stuff.
So, you may be wondering, what are the most popular automation scenarios in the context of Data Grid? The answer is: sorting and filtering.
To effectively automate such cases, you should be aware of different pitfalls which may appear on the front end as well as on the back end side.
Let’s take a look at a couple of popular issues, which may occur during testing. Then, we’ll try to perform root cause analysis, and understand how this information may help us in the further automation effort.
We will play with the same grid, which was described a little bit earlier.
Let’s say we want to check ASC sorting of the Age column.

Our sixth sense will likely whisper that 121 is a bit redundant, right? But how? Not quite obvious.
As QA Engineers, we have 2 options:
- File a bug and have a beer. Let’s leave it for Developers to handle.
- The alternative requires more time and brain involvement to perform at least a high-level root cause analysis.
As we are all Engineers (I hope), probably the second option will work better.
So the first thing we’d probably do is a browser’s Network tab analysis, right? Let’s check it.
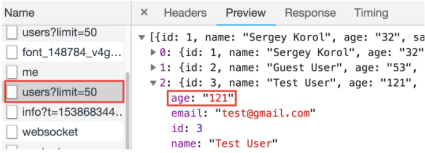
And what do we see? The Users endpoint returns JSON, where the age field has a string type! Really?! It means that the back end returns the wrong data type for some reason.
So what would be our next step? Checking the model, of course!
public class User implements UserDetails, Serializable {

    private static final long serialVersionUID = 7449222326401403686L;

    @Id
    @Column(name = "user_id")
    @GeneratedValue(strategy = GenerationType.IDENTITY)
    private Long id;

    @NotBlank
    @Size(max = 40)
    private String name;

    @NotBlank
    @Size(max = 4)
    private String age;
    //...
}
And here’s it, a root cause! Just look at the age field which has a String type. Nice catch!
Anything else we could do? Well, maybe it makes sense to double check a database? Let’s do it.
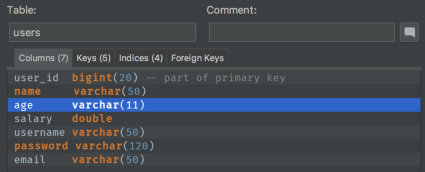
Look at this – varchar?! Fantastic! So we have put all things together. Most likely some Architect or Developer made a mistake while designing a database. Chances are that the other back end developer just generated an entity from DB schema, without any doubts regarding the column type mismatch. Why? “It was an Architect who had designed this DB,” he might have thought, “He definitely knows what to do!” On the other hand, the front end Developer didn’t bother with JSON schema validation.
As a result, we’re faced with a chain of human mistakes and a bit of indifference, which caused a bug with a single Grid’s column.
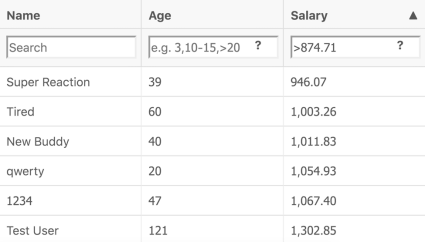
Here’s another example. Now let’s play with filtering. The same grid, but the Salary column. We’ll filter the users whose salary is > 874.71.
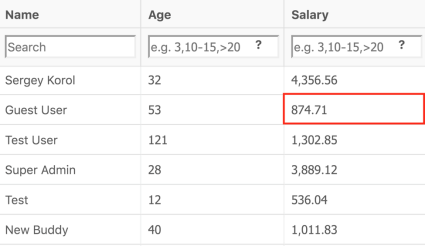
In the combination with ASC sorting, the results seem valid.
As we’ve copied this value directly from the grid, it would be also nice to check the boundary, right? Let’s use >= operator and check if the corresponding record will appear on top of the grid.
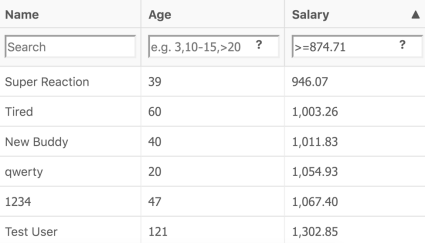
Oops, a new operator, but old results? How is it possible? Let’s perform a root cause analysis!
Again, looking at the Network tab and checking the response:
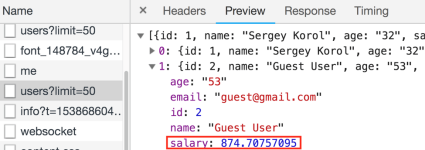
Nice! The backend returns 8 digits after a period. And the UI displays only 2. Here it is. Now we are sure that the problem is on the front end, right?
Let’s take a look at the Grid component. We are especially interested in the code, which is used for cells formatting.
export function floatFormatter(props) {
    return baseFormatter(props,
        val => isNumber(val)
            ? numeral(val).format('0,0.00')
            : val);
}
What a shame! We check if value is a number and just format it to the following view: 0,0.00.
And it’s easy to verify against UI. We just need to copy the full number, which comes from the backend, and paste it into the filter:
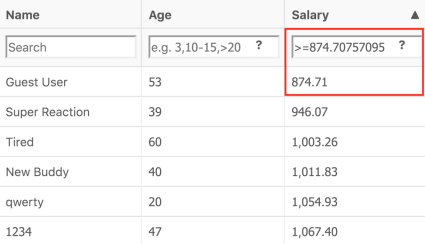
Nice catch, isn’t it? So what does such root cause analysis give QA engineers? First of all, now we know for sure, where the bug is stemming from. And what else? Apart from that, we can define a very straightforward set of issues to pay attention when you write automated tests:
- types mismatch
- rounding issues
- formatting issues
Of course, you can find out more during the detailed root cause analysis of any other issues. But I’ll leave it to you. 😉
The Balance Between Simplicity and Versatility
So what about the automation? It’s very important to keep the balance between simplicity and versatility, so that no matter what column you’re passing as input, your test will know exactly how it could be sorted, and moreover, how to check a sorting order depending on the types we’re working with.
@Test(dataProvider = "sortingData")
public void recordsShouldBeSortable(final Column column) {
    open(LoginPage.class)
        .loginWith(User.dummy())
        .sort(column, ASC);

    verifyThat(at(GridPage.class)).recordsAreSorted(column, ASC);

    at(GridPage.class)
        .sort(column, DESC);

    verifyThat(at(GridPage.class)).recordsAreSorted(column, DESC);
}

@DataSupplier
public StreamEx sortingData() {
    return StreamEx.of(AGE, SALARY);
}
The similar situation is with filtering. A test must be flexible enough to work with any column, operator and value type.
@Test(dataProvider = "filteringData")
public < T > void recordsShouldBeFiltered(final Column column, final Operator < T > operator, final T value) {
    open(LoginPage.class)
        .loginWith(User.dummy())
        .adjustColumn(column)
        .expandFilter()
        .filterBy(operator, value);

    verifyThat(at(GridPage.class))
        .recordsMatchCondition(column, operator, value);
}

@DataSupplier(transpose = true)
public StreamEx filteringData() {
    return StreamEx.of(SALARY, GREATER_OR_EQUAL, 874.71);
}
You may just be wondering, how we could achieve such conciseness and flexibility? In one of my Selenium Camp talks, I demonstrated the way of Selenium ExpectedConditions encapsulation behind simple enum values. This same technique could be applied to Grid columns:
@Getter
@RequiredArgsConstructor
public enum GridColumn implements Column {
    AGE(Column.TO_INT, NumericFilter.class),
        SALARY(Column.TO_DOUBLE, NumericFilter.class);

    private final Function < String, ? > valueMapper;
    private final Class < ? extends Filterable > filter;

    @SuppressWarnings("unchecked")
    public < T extends Filterable > T getFilter() {
        return (T) use(filter, this);
    }

    public String getName() {
        return name().toLowerCase();
    }
}
Tests or data providers may operate with some obvious names like AGE, SALARY, etc. But each column will know for sure which types it should work with, and how to convert Strings to the required data type. That’s very important since the Selenium testing framework gives us Strings. And we can’t operate raw Strings in the context of such tricky columns as AGE and SALARY. Otherwise, we’ll replicate the same issue, which we’ve just uncovered on the backend. Moreover, we’ll hide the real bug of the application!
The situation with operators is a bit trickier as we have 2 different representations of the same thing on UI and in the code. For humans it’s obvious to use operators like >, <, >= or <=. But the machine won’t be able to understand it, as it’s just a symbol. We can’t say: “Hey, Java Stream, here’s a >= symbol, take care of everything else”. So the only valid option is to teach our program, what this sign means in terms of data processing. And it also could be implemented with a help of enums:
@Getter
@RequiredArgsConstructor
public enum DoubleOperator implements Operator<Double> {
    EQUAL("", Double::equals),
    GREATER(">", (ob1, ob2) -> ob1.compareTo(ob2) > 0),
    LESS("<", (ob1, ob2) -> ob1.compareTo(ob2) < 0),
    GREATER_OR_EQUAL(">=", (ob1, ob2) -> ob1.compareTo(ob2) >= 0),
    LESS_OR_EQUAL("<=", (ob1, ob2) -> ob1.compareTo(ob2) <= 0);

    private final String value;
    private final BiPredicate<Double, Double> filter;
}
Such mappings allow keeping our code clean and flexible so that we could easily integrate a complicated data processing logic directly into the streams or assertions by request.
And don’t forget about the root cause analysis! It opens up some great new opportunities in terms of testing.
Charts Automation Principles
Our last part, the most complicated one, is dedicated to Charts. You may be wondering why the most complicated? Simply because you won’t find any useful information about Charts automation anywhere on the Internet. And you perfectly well know that people’s laziness already reached to the point when if there’s no detailed instruction or video found, they are just stuck without any chance to recover.
So what about the automation? The key question you should ask yourself before starting any charts automation effort is: how do they render?
Currently, there are 2 the most popular formats: Canvas and SVG. So if your charts are rendering as Canvas, I have some bad news for you. Canvas is just an image. And images could be automated either by means of screenshots comparison or using specialized image recognition tools like OpenCV or SikuliX. But I don’t believe you want to go down this fragile path. The best choice for automation is SVG. Simply because SVG integrates directly into the DOM, and could be easily accessed via the common API of the Selenium testing framework.
Ok, that is clear. And what can we test on the charts? I would highlight the following points:
- Data. That’s pretty straightforward if your charts reflect e.g. some table data, which you have access to. But sometimes data can be completely unmanageable in terms of the amount and external sources. So the latter case will severely restrict your testing to some edge cases, e.g. data anomalies detection.
- Business logic. This is a very domain-specific item. During one of my previous projects, we had 80% of features based on Grids and Charts. So you can imagine the variety of complex functionality which had to be tested.
- Visual elements. It is a subset of the previous item. It depends on whether you are using out-of-the-box charts’ features or some visual customization. The latter should definitely be tested.
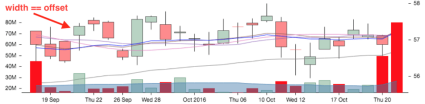
Now let’s see some interesting examples of how we can automate react-stockcharts.

This chart is a bit customized and rendered in the mixed (Canvas + SVG) mode. If we hover over any point, the following popup appears.
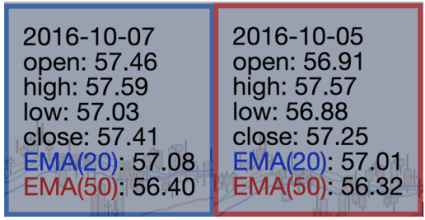
Let’s consider the following business requirements for further verification:
- Charts points should be located in the chronological order.
- The color of the popup border depends on the difference between open and close. The positive value should lead to the blue border. Otherwise, the popup should be red.
That seems quite obvious and someone may wonder if it’s reasonable to automate such cases at all. But from my experience, tricky bugs may appear even with such simple flows.
Let’s say, if the front end doesn’t perform any data pre-processing and renders everything as is, you’d be very surprised to see a “reverted” chart when the back end returns data in the DESC order. Or how would the second rule work in the case if open == close? Which color should be displayed? 🙂
To automate such scenarios we need to define an algorithm first. And you’ll definitely be astonished to find out how easy it is. There are only 2 simple actions involved:
- Moving cursor over some point on the chart.
- Extracting some information from the popup for further analysis.
So basically, we need to hover over each point (which is called a candle for this particular chart type), and extract the text from the popup.
Both actions are pretty common for Selenium. Moreover, almost all automated tests require some data extraction from UI. Is it that simple in the case with a mouse move? To answer this question, let’s first think about what inputs we need to handle within such a task?
Probably, we will start with the chart width and height to define the restrictions, right? What else? We’d definitely need [x; y] coordinates to perform a movement. And if y could be a fixed value, due to the way the chart renders a tooltip (popup will be displayed at any point), x is a bit trickier. We can’t just increment its value on each iteration. The chart is a set of pixels, and each candle has a fixed width, which is > 1. So our main goal is to find the width of a candle, which would be an x offset for each iteration. This could be done via an online ruler browser extension.
Ok, now we know exactly what to do. Let’s see how we can apply automated testing here.
@Step("Scan chart and retrieve tooltips info.")
public ChartPage scan() {
    val chart = $("rect.react-stockcharts-crosshair-cursor");
    val width = parseInt(chart.getAttribute("width"));
    val height = parseInt(chart.getAttribute("height")) / 2;

    StreamEx.iterate(0, x - > x + CONFIG.movementStep())
        .takeWhile(x - > x <= width)
        .forEach(x - > moveTo(chart, x, height).readTooltipContent());

    return this;
}
After receiving the required inputs, we can use an infinite stream to update x coordinate, before reaching the right border (chart width). On each iteration, the two actions described above are performed: moving the cursor and reading the tooltip content.
private ChartPage moveTo(final SelenideElement element, final int x, final int y) {
    actions().moveToElement(element.getWrappedElement(), x, y).perform();
    return this;
}

private ChartPage readTooltipContent() {
    val date = parse($("tspan[data-qa=time]").text(), ofPattern("yyyy-MM-dd"));
    val open = parseDouble($("tspan[data-qa=open]").text());
    val high = parseDouble($("tspan[data-qa=high]").text());
    val low = parseDouble($("tspan[data-qa=low]").text());
    val close = parseDouble($("tspan[data-qa=close]").text());
    val color = $("g.react-stockcharts-tooltip-content>rect").getAttribute("stroke");

    tooltipContentList.add(new TooltipContent(date, open, high, low, close, color));

    return this;
}
Note that it’s better to parse tooltip data into the entity and save it into some collection for more flexible post-processing on verification steps.
@Data
public class TooltipContent {

    private final LocalDate date;
    private final double open;
    private final double high;
    private final double low;
    private final double close;
    private final String color;

    public boolean hasColor(final StrokeColor color) {
        return Color.fromString(this.color).equals(color.getValue());
    }

    public boolean hasPositiveEODValue() {
        return open - close >= 0.0;
    }
}
The entity may also encapsulate additional logic for color rules processing. Let’s see how it can be used on the assertions level.
@Step("Verify that tooltip dates are in chronological order.")
public ChartAssert tooltipDatesAreInChronologicalOrder() {
    isNotNull();
    val actualDates = StreamEx.of(actual.getTooltipContentList())
        .map(TooltipContent::getDate)
        .toList();
    val expectedDates = StreamEx.of(actualDates)
        .sorted(LocalDate::compareTo)
        .toArray(LocalDate.class);
    Iterables.instance().assertContainsExactly(info, actualDates, expectedDates);
    return this;
}

@Step("Verify that tooltip colors match EOD price diff rules.")
public ChartAssert tooltipColorsMatchEODPriceDiffRules() {
    isNotNull();
    Iterables.instance().assertAllMatch(info, actual.getTooltipContentList(),
        tooltip - > tooltip.hasPositiveEODValue() ? tooltip.hasColor(BLUE) : tooltip.hasColor(RED),
        new PredicateDescription("Tooltip colors match EOD price diff"));
    return this;
}
The first verification scenario is pretty straightforward, as checking the chronological order could be treated as a classic sorting task.
Checking the color rules for tooltips is a bit tricker, as we have to define a custom predicate, which “asks” 2 questions:
- is the difference between open and close positive?
- depending on the first answer, we may ask a second question: which color does a tooltip have?
These 2 answers should be applied for each tooltip. And if all of them match specified criteria, a test will pass.
@Test
public void chartPointsShouldMatchDateAndColorRules() {
    open(LoginPage.class)
        .loginWith(User.dummy())
        .select(ChartPage.class)
        .scan();

    verifyThat(at(ChartPage.class))
        .tooltipColorsMatchEODPriceDiffRules()
        .tooltipDatesAreInChronologicalOrder();
}
As you can see, the body of the test is very concise and readable.
Was it too complicated? Not really, right? But this simplicity can be achieved only if you follow some basic conventions regarding data-qa attributes (as the charts components like tooltips are not quite fancy in terms of the DOM structure), and your charts are rendered in the SVG format.
If you’re still wondering whether it is reasonable or not to automate such scenarios, remember how much time you’re wasting on each testing phase by checking all these tricky moments manually. Wouldn’t it be better to delegate such tasks to a machine? 😉
Summary
- Learning your product’s internals will open absolutely new opportunities in terms of automated testing. You’ll get a better understanding of the nature of issues, which will definitely help you to prepare a more concise automation strategy.
- In terms of internal communications, always prefer negotiations over workarounds. Don’t be scared of asking Developers to add some custom attributes or open backdoors if it can drastically simplify the overall testing effort.
- Invest your time in learning programming languages. Only a strong technical background will help you to evolve and adapt to any IT environment changes in the future and adopt best practices.
That’s pretty much it on how to test React applications. Feel free to ask any questions. As always, you can find a full source code on my GitHub.