In the previous sections, we considered the software and hardware aspects of implementing Embedded Artificial Intelligence. Here, we will apply this knowledge to cover the step-by-step process of developing such systems.
Step 1: Assessment of System Requirements
Take into account that in addition to executing some common programs, such as initial startup, basic component initialization routine, and running the main programs, your system will also be loaded with AI workloads. Thus, make sure the following items are on your requirements check-list:
- Processing Power
The complexity of your machine learning model is the key factor defining the required processing capacity. The more complex your model is, the stronger the CPUs or GPUs and AI accelerators you will need. Also, note that real-time applications, for example, facial recognition in security systems, require faster processing. Meanwhile, non-real-time AI applications such as anomaly detection are more flexible in processing power requirements. - Memory
Larger models with more parameters require more memory to store during operation. Also, the amount of data your system needs to process at once will impact your memory needs. For instance, processing high-resolution images requires more memory as compared to lower-resolution ones. - Storage
First, define how much storage you’ll need for holding your trained ML model. Second, count that your system will have to store a certain amount of data for processing or buffering, especially when dealing with real-time applications. - Power Consumption
If your device is expected to be battery-powered, energy efficiency is critical for you. Use techniques for optimizing your model parameters, hardware design, and software execution to build an energy-efficient system architecture. - Connectivity
Network connectivity needs for the system, such as uploading data to the cloud or receiving updates, will define the connection protocols and ports your embedded system should include. - Sensors and Actuators
Think about how you expect your device to interact with the physical environment and consider the interfaces you’ll need for the sensors and actuators on your edge device. - Physical Form Factor
The size and weight constraints of your device will also influence the type of hardware components you can use.
This is only the list of the system aspects that can be found in any embedded project. Each application is unique and designed for different purposes, so it would be impossible to provide a comprehensive list of requirements to fit every possible use case. However, you can always reach our embedded software development experts to get professional consultation and help in defining your system requirements.
Step 2: Selection of Machine Learning Models
Today, there’s a variety of proprietary and open-source AI models you can train on your data and use for your specific applications. However, to pick the right one, you’ll need to ask yourself and answer certain questions:
- What is the application functionality the ML model should deliver, e.g. image classification, sensor data analysis, anomaly detection, behavior tracking etc.?
- What underlying ML algorithm will fit the functionality needs: decision trees, support vector machines (SVMs), or lightweight convolutional neural networks (CNNs), for instance?
- Does the application require real-time processing or can it work with some latency? What inference speed is expected?
- What is the acceptable level of model accuracy?
- What amount and type of data will the model need for training? This will impact storage and processing needs as well as model efficiency.
- What CPU, GPU, memory, storage, and power constraints should be taken into account?
- Is it possible to leverage model optimization techniques and Tiny ML tools such as TensorFlow Lite, Edge Impulse, or Arm NN?
Having answered these questions, you will understand the level of model complexity, accuracy, and speed you actually need. You’ll then be able to map these needs onto your device hardware restrictions to see whether you have to come up with additional optimization strategies.
You can take an agile iterative approach to the selection of your AI model and start with prototyping simpler and pre-trained models. This will help you quickly assess its feasibility and performance on your embedded system. You can use specialized benchmarking tools to see how different models execute on your target hardware, comparing accuracy, inference speed, and resource consumption.
Step 3: Data Preparation and Preprocessing
Once you clearly understand your application functionality and have defined the ML algorithm or model you need to work with, it’s time to get down to preparing data for it to train on.
Data Collection
Start with considering which data exactly you need to feed to your ML model and where this data will be coming from in your system – sensors, external databases, simulations, etc. If your model is designed for supervised learning and has to provide classification or prediction functionality, you will need to have your data labeled. To train your model look for hidden interconnections and insights, unsupervised learning with unlabeled data is applied. Data labeling can be automated or manual, depending on the dataset specifics. You might also need to do data cleaning and validation to make sure your model won’t be biased or erroneous.
Data Preprocessing
You might also need to use data formatting for adjusting your dataset for model training and data normalization to improve model training efficiency. We recommend splitting all your data into training, validation, and test sets to ensure you have plenty of data for each model training phase. Give priority to techniques that will minimize resource usage in your embedded AI system, for example, data compression or on-demand data fetching from the cloud. To minimize latency for real-time applications, the data preprocessing pipeline at inference has to be fast and efficient.
Data Engineering
You can apply such data engineering techniques as scaling, normalization, dimensionality reduction, and new feature creation to make raw data more informative for your model. Augmenting the training data by adding noise and diversity can help improve the ML model’s accuracy and ability to generalize. However, make sure it doesn’t become too complex for your hardware.
Step 4: Model Training and Optimization
With your training data collected and preprocessed and your model of choice at your fingertips, you can start model training. ML model training can be done in different ways: supervised and unsupervised learning.
During supervised learning, the ML algorithms are provided with labeled data, so the algorithm needs to do fewer calculations to establish correlations and rules. Such models will be less computationally complex. Supervised learning is common for training the model for classification and forecasting tasks.
In unsupervised learning, the ML algorithm is given unlabeled data for it to figure out as many implicit trends and correlations as possible. Such models will require more computational effort. They are typically applied for data clustering, recommendation engines, and drawing insights.
There’s also reinforcement learning – a methodology commonly used in robotics for skill acquisition and learning tasks. It is based on the immediate feedback or effect of the external stimuli once the system performs an action that help it learn whether it was successful or not, similar to how a small child learns the dos and don’ts. It is also said to be more computationally complex than supervised learning.
If your ML model turns out to be too complex for your needs or resources, you can resort to certain model optimization techniques:
- Model Pruning: the removal of excessive connections in the model that helps reduce the model’s complexity and memory footprint.
- Quantization: the reduction of calculation precision (e.g., from 32-bit to 8-bit) that significantly eases the memory and processing power demands.
- Knowledge Distillation: a method of training a smaller model by transferring knowledge from a larger pre-trained one. This helps to achieve plausible model accuracy with lower processing needs.
Also, as mentioned before, there are Tiny ML tools, libraries, and frameworks (TensorFlow Lite or Edge Impulse) specifically designed for adjusting ML models to the requirements of embedded AI, offering optimizations for memory usage and power management.
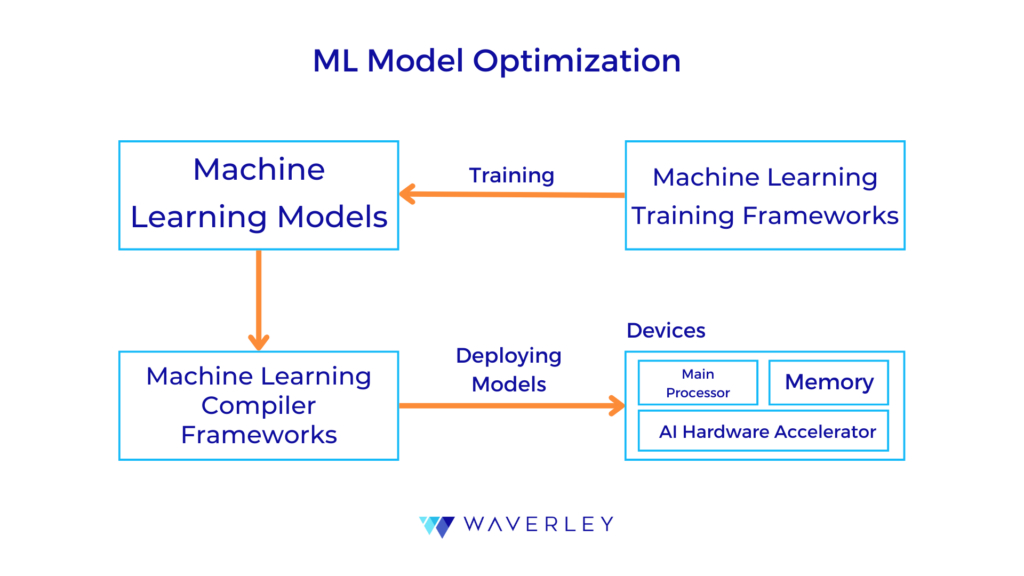
Step 5: Model Deployment onto the Embedded System
As the model format suitable for your embedded system can be different from the model training format, first make sure it is well-optimized to meet the hardware restrictions and converted to the appropriate format.
To run the model on your device, you will need an inference engine for loading the converted model and processing the new data with it. Popular inference engine options include TensorFlow Lite Micro, Edge Impulse runtime, or Arm NN. Also, wrapper code is needed for your system to interact with the inference engine and integrate it with the core system functionalities, for example, incoming data preprocessing at inference, passing it to the inference engine, and handling the model’s output.
For embedded devices, make sure you use a well-optimized model architecture that fits the processor capabilities, there’s enough memory allocated to store the converted model and any temporary data, and energy consumption by the model at inference is efficient.
Step 6: Security Measures
Any system that collects, processes, and stores some sort of data can be the potential goal for hackers and the source of trouble for its users or owners. This gets even more serious if it deals with sensitive data. To avoid any mishaps to the highest extent possible, taking different security measures is critical. In the context of embedded systems running AI models, we may consider three security levels.
Model Security
Machine learning models can be vulnerable to adversarial attacks where malicious actors craft inputs that cause the model to make wrong predictions. To improve the model’s robustness, you can implement adversarial training – training the model with adversarial examples.
Such techniques as digital signatures or cryptographic hashing can help you verify the integrity of the model deployed on the device and make sure the model doesn’t get tampered with by unauthorized parties.
For systems handling sensitive data, consider using privacy-preserving techniques for model training, such as federated learning and differential privacy. These approaches allow training on distributed data without compromising individual data privacy.
System Security
Secure boot mechanisms help ensure that only authorized firmware and software are loaded onto the device at startup and prevent unauthorized code execution and potential system compromise.
Secure communication protocols with encryption and authentication are must-haves if your system communicates with external servers or transmits data.
As hackers never stop looking for new system weaknesses, regular updates for the system software and the AI model itself will ensure you have all the latest security patches installed and any known vulnerabilities addressed.
Access control mechanisms will restrict unauthorized access to the system’s functionality and configuration settings.
Hardware Security
When looking for system components, check for suitable hardware that supports secure enclaves – isolated hardware execution environments – to store and execute security-sensitive code and data related to the AI model.
Tamper-evident packaging for hardware components you order helps track unauthorized physical access and prevent unwanted hardware modifications.
Step 7: Testing and Validation
When checking how our embedded machine learning system works, we can view two “phases” of testing:
- Model testing. First, this should be done as soon as we have a trained model to see how it performs on new data from the testing dataset we prepared at the data preparation stage. Using the benchmarking tools, we can compare the accuracy, speed, and resource consumption characteristics of different models (if available) that we run on the target hardware. This can be done iteratively until the optimal result is achieved.
- Integration testing. Upon model deployment and integration, it is important to make sure that the model and the rest of our embedded systems interact as expected. At this stage, we can use a simulated or real-world environment to observe the actual system performance and identify issues.
When testing embedded AI systems, make sure to take the following aspects into account:
- Edge cases and error handling must be covered to ensure the device responds adequately to unexpected inputs, invalid data, sensor malfunctions, or errors.
- For real-time applications, it is critical to test if the system meets the required processing deadlines.
- To check the model’s robustness in real-world conditions, test it using testing data with slightly different distributions compared to the training data.
- Applications with strict security requirements will make use of testing with adversarial examples – crafting malicious inputs to get the model to make wrong predictions, as well as penetration testing assessing the system’s resistance against hacking attempts.
- Performance and resource usage can be tested by measuring and monitoring memory usage and processing and energy power consumption.
- Real-world environmental factors, such as temperature variations, noise, and vibrations can have a serious impact on the embedded system’s performance, so if the device is expected to be placed in extreme environments, these should be included in the test cases list.
- If the system is designed to interact with users, it should undergo usability testing.
Step 8: Continuous Monitoring and Optimization
Continuous monitoring of the ML model’s performance in the embedded system as well as general system monitoring is key for ensuring the device’s reliability, stability, and longevity.
Data Collection and Logging
Wherever possible, strive to track the system metrics and performance indicators. For model performance, these include as accuracy, precision, recall, or inference time, helping to spot performance degradation with time. To control the system’s well-being, we can monitor memory consumption, CPU/GPU utilization, and power consumption. Logging errors or exceptions will help diagnose potential issues. To store and transmit the collected monitoring data, we can opt for on-device storage, edge storage (storage on a nearby device with more capacity), and cloud storage, depending on the system’s hardware restrictions, available resources, and general software architecture.
Monitoring Tools and Techniques
Based on the collected metrics, anomaly detection algorithms will identify deviations from normal behavior in the system and thus detect potential issues before they can significantly impact performance.
Visualization dashboards present the collected monitoring data in an easily understandable format so that you can quickly identify trends, patterns, or anomalies in system behavior.
An alerting system in place that triggers notifications when specific thresholds are crossed or anomalies are detected will enable you to address potential problems in time.
Remote Management and Updates
Secure remote access will allow for diagnostics, configuration changes, or model updates whenever needed.
With over-the-air (OTA) updates for the system software and even the AI model, you can deploy bug fixes, security patches, or improved models without physical access to the device.