All Aspects Of Spring Boot Configuration

Contents

Introduction

Microservices architecture in web application development has become increasingly popular recently. It helps engineering teams minimize the need for communication, alleviate risks, and reduce application development time when it comes to adding new features to an existing web application. And, of course, the main benefit of microservices architecture is the increased scalability of our web application. 

But, along with all the advantages, the popularity of microservices architecture raises some additional challenges to be solved. The more microservices we have in a web application, the more pressing the need is to have a consistent way of altering their configurations based on certain types of environments they are deployed to, such as development, testing, and production environments. 

This is where externalized configuration and profiling come into play. Next, you may decide to distribute and centralize your configuration in order to make common settings shared between different types of applications. Once you’ve gathered all settings in a single place, it may raise another issue when multiple instances of the same type need to access different versions of the same configuration when dealing with canary or rolling deployment strategies, for example. Moreover, the variety of profiles and versions supported simultaneously increases the risk of losing track of changes. This is where you may start thinking of auditing. In this article, we will see how you can use <Spring Boot: https://spring.io/projects/spring-boot>  in conjunction with its <Spring Cloud Config: https://cloud.spring.io/spring-cloud-config> module to easily solve all these problems with minimal effort and almost no impact on our web application source code.

Background of Spring Boot Configuration

Why Spring Boot?

Spring Boot has become an undisputed winner in the modern Java developers world. Why is it so popular? Spring Boot is an extension of Spring Framework that is meant to introduce auto-configuration into the process of Spring application development and deployment. What are some of the top advantages of Spring Boot? 

  • It provides an easy start and convenience for managing dependencies.
  • It allows us to minimize writing boilerplate code down to zero by applying best coding practices for the most common scenarios. For instance, you can secure your entire application with just a few lines of code using the Spring Security module.
  • Using Spring Boot allows us to customize whatever we need at any time, with minimal effort – by following the so-called drop-in approach, we can alter behavior by defining or overriding a bean in one place and leaving everything else untouched. For instance, you can easily use an in-memory database in your tests by simply adding a corresponding dependency to your classpath.

In this article, we will follow the same approach of reuse, minimization, and thinking in advance when talking about Spring configuration. To keep it simple, we’ll be always referring to Spring Boot, even though some of the features being discussed are natively supported by Spring Framework itself.

Property-based configuration in Spring Boot

In this article, we will be talking about property-based configuration. It is natively supported by Java from the beginning of the Earth and it’s not likely to have any alternatives in the nearest future. When I say “property” I mean both .properties, .yaml, and any other formats, such as config tree, that allow defining namespace-based structure and are treated as properties by Spring Boot when it comes to accessing the configuration.

In Spring Boot, there is also a notion of annotation-based vs xml-based configuration. Mostly, we will be talking about what is applicable to both, but the examples will be given with annotations as a more advanced approach.

Ways to access Spring Boot configuration

How can our Spring Boot application access configuration properties? Let’s assume that we have a demo.value property defined and we want to access its value from Java code. Spring Boot provides three simple ways for doing that:

  1. @Value annotation

The property can be evaluated using the Spring Expression Language (SpEL) and injected with @Value annotation:

@Value("${demo.value}") String value;
  1. Environment bean

You can inject the Environment bean automatically created by Spring Boot for us and use its methods to read configuration properties of interest:

@Autowired
Environment environment;
...
environment.getProperty("demo.value")

This option is more boilerplate than the previous one, especially when there is only one property to be accessed within a java class. But Environment is not only about properties, it holds a little bit more information and once the bean is already injected, you might find it beneficial for property retrieval as well. 

  1. @ConfigurationProperties annotation

One more way to access configuration with Spring Boot is to map properties to a corresponding data structure by using the @ConfigurationProperties annotation:

@Component
@ConfigurationProperties("demo")
public class Demo {
   String value;
   // getters and setters
}

This is a very simple example of using Spring Boot where we have a simple field of String type and the bean annotated itself. The approach is much more powerful than that. You can annotate the bean factory method instead, which can be handy if you are dealing with a third-party data structure that can’t be modified or you want to reuse the same bean for multiple groups of properties with different prefixes. The annotation supports many data types out of the box, including nested structures and collections. It may also be integrated with declarative data validation if needed. In many cases, this makes @ConfigurationProperties more preferable than @Value.

Ways to define Spring Boot configuration

Spring Boot supports more than a dozen ways to define configuration properties. You can find them all in the <official documentation: https://docs.spring.io/spring-boot/docs/current/reference/html/spring-boot-features.html#boot-features-external-config> . To save your time, I would mention that some of them have already lost their relevance. For instance, nowadays, you would not want to use either JNDI attributes or Servlet context init parameters. You may still observe them in legacy projects, but Spring Boot does its best to keep you away from such extreme measures. I would also skip options that imply hardcoding values or writing any supplementary instructions in java code as not fully externalizable. Keeping this in mind, all the remaining relevant options in Spring Boot can be divided into five groups:

  1. Config files
application.properties
  1. Config server
spring.config.import=configserver:http://localhost:8888
  1. Environment variables
DEMO_VALUE=abc => demo.value=abc
  1. System properties
java -Ddemo.value=abc -jar demo.jar
  1. Command line arguments
java -jar demo.jar --demo.value=abc

These Spring Boot options contain very simple examples and are sorted in order of priority where all subsequent items override the preceding ones, i.e. config files have the lowest priority and command line arguments – the highest.

Config files is where you usually start when building a new Spring Boot application. You are probably aware of their default search paths and naming conventions. It is worth mentioning that all the defaults are adjustable if needed.

Environment variables, system properties, and command line arguments are usually used to override key properties such as active profile or locations for config files. They are also often used as integration points with cloud native settings, e.g. inside docker-compose and Kubernetes deployment files. These are well-known techniques and should not raise many questions.

Config server and the relatively new instruction spring.config.importare things about Spring Boot you might not be aware of yet. The instruction spring.config.importallows us to import additional properties from different sources. The example mentions the configserver source type. Other supported types are file, classpath, and configtree, which are file-based and are not so interesting here in terms of configuration aspects being discussed. configserver is special, as it instructs to connect to a remote server via http and fetch configuration from there based on certain rules. The option is supported in Spring Boot thanks to the additional Spring Cloud Config module and this is where the real power of configuration management starts. Let’s have a deeper look at what it gives us.

Spring Cloud Config

Spring Cloud Config allows our Spring Boot application to fetch its settings from a remote service via HTTP. In this flow, our application is referred to as Config Client and the remote service is Config Server. Config Server is split into two parts: the HTTP frontend and data storage called the Backend.

The Config Server structure

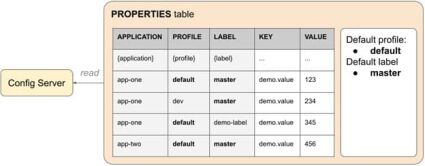
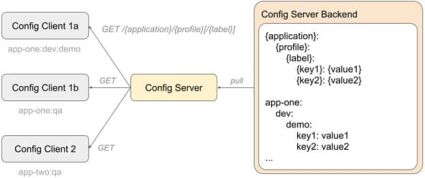
Config Client fetches data based on a composite key of three values: application, profile, and optional label. Later, we will see what purpose each of them serves. For now, it is enough to mention that the first one allows grouping properties per client application type, profiles serve the same purpose as in traditional property-based configuration, and labels can be used for versioning.

Spring Cloud Config feature is enabled in Spring Boot by adding a few dependencies to classpath and writing a few lines of initial configuration.

Config Client

To make your Spring Boot application act as Config Client, you simply need to add the spring-cloud-starter-config dependency and specify the following set of configuration properties: 

spring.cloud.config.name=demo-app		 # {application}
spring.cloud.config.profile=demo-profile # {profile}
spring.cloud.config.label=demo-label	 # {label}
spring.config.import=optional:configserver:

To specify application and profile, you could also use Spring Boot native properties spring.application.nameand spring.profiles.active, while the cloud-specific ones have higher priority if both are present. There is no native alternative for a cloud-specific label property. Even though all three properties are optional, application and profile will still have default values assigned on the client side (which are “application” and “default” correspondingly). Only a missing label won’t be requested from the client side and it is up to the config server to choose a default value (which is backend-specific and can be “master”, “trunk”, etc.)

In the above example of Spring Boot configuration properties, the config server URI is omitted and the default value of “http://localhost:8888” is used. You can explicitly specify your URI or even a list of URIs separated with commas. Also, it is marked as optional in the example, which means we let our client Spring Boot application start even if the config server is not available.

Config Server

To make your Spring Boot application a Config Client, you need to add the spring-cloud-config-serverdependency, put the @EnableConfigServer annotation, and specify a set of backend-specific properties. Here is an example for Git backend:

server.port=8888
spring.profiles.active=git
spring.cloud.config.server.git.uri=https://example.com/path/to/your/repo.git

Port 8888 is the default value used by config clients and if you choose a different one here in Spring Boot, you need to adjust the client settings accordingly. Active profile tells us which type of backend to use. Just for visibility, the example explicitly mentions git, which could be omitted as the default value for the backend type. Next, you specify the backend-specific properties following the format: spring.cloud.config.server.{backend}.*. In this particular example, there is a single URI property. The easiest way to see the full list of properties supported by the backend of interest when using Spring Boot is to search for the corresponding implementation of the EnvironmentRepositoryProperties interface in the java source code. There, you’ll find default values used by the backend as well. You might need additional classpath dependencies like the JDBC driver based on a specific selected backend.

Config Server is designed to be a generic solution serving clients written in different technologies, not only in Java. That’s why it exposes a variety of endpoints that support several data formats. The one used by Config Client is /{application}/{profile}[/{label}]. It returns a JSON structure tied to Java classes from the Spring Cloud Config library. The structure itself is not so important here because the whole communication layer is fully encapsulated inside the library. The endpoint’s path embodies a composite key of three values that were mentioned before. The Spring Boot Config Server uses a composite key to build search criteria suitable for the underlying Backend. It could be a file path in the case of Git repository or SQL query parameters if a JDBC-compatible backend is used. Here is the full list of currently supported backends: Version Control (Git, SVN), File System, AWS S3, JDBC, Redis, HashiCorp Vault, CredHub, Composite, Custom. In our case,  “Composite” means that you can fetch and aggregate data from different backends at a time and “custom” means that you can provide your own implementation. You can find more details about each Backend <here: https://cloud.spring.io/spring-cloud-config/reference/html/#_environment_repository>.

Just for visibility, let’s see how input application, profile, and label are treated by Git and JDBC Backends. These two completely different data storages will give you an idea of how others work.

Git Backend:

Git Backend persists data in property files, where target file names are searched based on the requested application and profile.

git backend

The Backend merges properties from the default file, without suffix, and a profile-specific one, giving the latter higher priority. The requested label is used to identify the desired version of the file and can be either commit id, branch name, or tag. If no label is specified by the client, then “master” is used by default in Spring Boot.

JDBC Backend:

The JDBC Backend implies any JDBC-compatible database.

By default, it stores data in a PROPERTIES table with five columns. APPLICATION, PROFILE and LABEL columns match the composite key requested. KEY and VALUE constitute the values to be returned. If no label is specified by the client, then “master” is used by default. Backend merges the records matching the PROFILE = “default” description and the profile-specific ones, giving the latter higher priority.

Custom Backend:

Official Spring Boot documentation is not too verbose about the Custom Backend implementation details and, moreover, I find it a little bit misleading. Namely, it says that you need to provide your own EnvironmentRepository bean to be included as a part of a composite environment. It does not mention any other classes to be implemented or how exactly to link the composite environment to the Java code. That is why I would like to tell you a little bit more about what happens under the hood with Spring Boot and what classes actually need to be implemented. Here is how a custom repository is normally configured:

spring.profiles.active=composite
spring.cloud.config.server.composite[0].type=demo

Here, “composite” is a predefined word and “demo” is the name of your custom repository. What Spring Boot does in this case is loops through beans of the EnvironmentRepositoryFactory type (not EnvironmentRepository!) and searches for a bean whose name starts with “demo”. Then the found factory is used to instantiate the EnvironmentRepository. In other words, you don’t need to explicitly define a bean of the EnvironmentRepository type. Moving further, EnvironmentRepositoryFactory is parameterized with the EnvironmentRepositoryProperties interface and you will have to implement it unless you are lucky to find an existing class with identical config options, which is very unlikely. To summarize, with Spring Boot, in total you will have to implement three interfaces and define a bean of the EnvironmentRepositoryFactory type:

public class DemoRepository implements EnvironmentRepository {
   @Override public Environment findOne(String application, String profile, String label) {...}
}
public class DemoProperties implements EnvironmentRepositoryProperties {
   @Override public void setOrder(int order) {...}
}
public class DemoRepositoryFactory implements EnvironmentRepositoryFactory<...> {
   @Override public DemoRepository build(DemoProperties properties) {...}
}
@Bean
public DemoRepositoryFactory customRepositoryFactory() {
   return new DemoRepositoryFactory();
}

One more point to mention about Spring Boot is that if the config client requests multiple profiles at a time, they will be passed to your EnvironmentRepository as a single comma-delimited string and it’s up to the custom implementation to parse the input value and build an aggregated result accordingly. 

Relaxed binding

The last thing I would like to mention before we jump to aspects of Spring Boot configuration management is Relaxed Binding. We have discussed many ways to specify configuration properties when we use Spring Boot and it may happen that a property name that works fine with one source becomes eligible for another due to some special characters included. For example, your operating systems may not allow the dash  “-” to be part of an environment variable name. To solve such problems, Spring Boot applies so-called Relaxed Binding: it supports replacements for certain characters when matching property names. For example, all three properties

demo-value=abc
DEMO_VALUE=abc
demoValue=abc

can be equally mapped to:

@Value("${demo-value}")
String demoValue;

@ConfigurationProperties
public class Demo {
   String demoValue;
   // getters and setters
}

However, when dealing with @Value annotation in Spring Boot, not all Relaxed Binding rules are bidirectional. For example, it won’t work if you define your property as demo-value=abc and try to access it with @Value("${DEMO_VALUE}"). This is because Relaxed Binding is aimed to solve real scenarios you may face in practice, and supporting unnecessary combinations would increase ambiguity. In general, they recommend using a kebab case variant (with dashes) whenever possible. Also, this is an additional reason to use @ConfigurationProperties instead of @Value because the former has fewer problems with data binding in Spring Boot. The main points I would like to emphasize here are:

  1.  If you decide to switch from one property source to another and face issues with special characters, don’t hurry to either give up the idea or change mapping in Java code. Simply check how Spring Boot allows character escaping.
  2. Follow the recommendations for data mapping. It will allow you to benefit from Relaxed Binding and make you more flexible in switching property sources in the future.

Aspects of Spring Boot Configuration

Now we have enough background to start splitting our knowledge into a variety of aspects and see what needs each of them serves. You will probably notice that the majority of aspects will be related to the Spring Cloud Config module, while only few of them are relevant for Spring Boot itself. Why is that? It is because pure Spring Boot provides facilities to build just a single Spring application and most of the problems we will be touching on do not show up at this stage yet. Only when you move to Microservices architecture in conjunction with cloud deployment, you start dealing with relations and interactions among multiple applications inside a distributed environment. This is where additional features from the Spring Cloud project come into play and Spring Cloud Config is one of them.

Externalized configuration

Externalizing means moving configuration outside of an application source code. When we talked about property consumption, did you notice that our Spring Boot application had no clue where the settings came from? And we did not write a single line of code to support that. Even the extra configuration needed to connect to Config Server can be completely externalized. Then, the only modification your Spring application might need over time is additional dependencies in classpath, which is a super easy change thanks to Spring Boot Starters – the Spring Boot dependency descriptors. Externalized configuration not only makes our code cleaner, it also allows altering of settings at any time without the need to redeploy or even restart our web applications.

Profiling

Profiling is a key feature natively supported by both Spring Boot and Spring Cloud Config. We can name property files following the convention {application}-{profile}.properties and the file will be automatically picked by Spring Boot once the suffix matches the active profile. In the case of Spring Cloud Config, both {application} and {profile} contribute to composite search criteria and it is up to the underlying Backend implementation to group profile-specific data in a convenient way. For example, file-based backends, such as Git repository or native file system, use the same naming convention as Spring Boot, for instance. In any case, the client application itself is not aware of the storage details.

The most common use case of profiling in Spring Boot is grouping settings based on the environment type. During development, for instance, you might want to disable access to some external resources or use their embedded alternatives. It is not only about the software development life cycle, though. Some products support both on-premises and cloud deployment modes and profiling can also help to differentiate environment-specific settings even in production.

Distributing

Distributed configuration with Spring Boot makes it possible to choose different data storage types and even switch them over time, keeping the client applications completely unaffected. It is also a starting point for other aspects, such as centralizing.

Centralizing

Centralizing allows us to efficiently reuse and manage settings. It could be either identical applications from an autoscaling group or common settings shared between different types of applications. The Spring Boot management includes keeping updates synchronized among multiple Spring applications, monitoring, troubleshooting, and everything else that you benefit from keeping data in one place.

Scaling

You might want to scale your Config Server to increase its availability and there are two ways to achieve that with Spring Boot. One way is to launch multiple instances of Config Server and list them all in spring.config.import separated with a comma. Another option is to use service discovery. In case of the latter,  config clients look up the instances of the config server from the service registry instead of connecting to them directly. This requires enabling the Discovery First Bootstrap mode, when client applications connect to the service registry before reaching the config server. By default, Spring Boot uses the Config First Bootstrap mode. The difference between the two modes and their benefits can be seen from the sequence diagrams:

To get more details about the bootstrap modes, please follow the <link: https://cloud.spring.io/spring-cloud-config/reference/html/#discovery-first-bootstrap>.

Versioning

Thanks to load balancing, we are able to apply incremental updates with Spring Boot without letting our production system down. This implies having multiple versions of the same Spring Boot application running simultaneously for some time. If they are connected to the same Config Server, there is a need to version their configuration somehow. From the client-side perspective, the desired version is set via a label that further participates in search criteria. The way the label is interpreted by the Config Server depends on the Backend. Version control systems, such as Git or SVN, treat it as a natively supported version indicator similar to commit id, branch name or tag, while JDBC backends reserve an additional column for the label and use it as a part of the composite key.

Auditing

The more flexible and dynamic our system is, the higher the risk of something going wrong over time. Auditing changes in our Spring web application is an integral part of troubleshooting in this case. The way you enable audit in Spring Boot is Backend-specific. With Git, you receive it for free because keeping track of changes is the nature of any version control system. In AWS S3, it can be achieved by using the Bucket Versioning feature. Other backends may require a little bit more effort to implement. With the JDBC backend, for instance, you can create a dedicated log table and make it populated with database triggers.

Refreshing

There is a way to refresh application settings in runtime without the need to redeploy or restart our system. However, to make it happen in Spring Boot, we need to use Spring Cloud Config dependency and explicitly trigger the updates. There are two scenarios supported: refreshing just a particular client application and getting all applications updated at once. In both cases, we use the <Spring Boot Actuator: https://docs.spring.io/spring-boot/docs/current/reference/html/production-ready-features.html > dependency in all applications we want to become refreshable. In conjunction with Spring Config Client library, it makes two endpoints available: refresh and bus refresh.

To refresh a single client, we must expose its /refresh endpoint and trigger updates by sending POST /actuator/refresh:

To refresh multiple clients at once, we need to add a few more dependencies to all refreshable applications and connect them to <Spring Cloud Bus: https://spring.io/projects/spring-cloud-bus>. Then by hitting POST /actuator/busrefresh on any client connected to the bus, we will get a notification broadcasted to all other clients and each of them will start refreshing its state:

It is also possible to keep your applications refreshable with Spring Boot , even if you do not want to use Config Server. To do so, you still need to have Spring Cloud Config dependency, but, by default, it requires the spring.config.import property pointed to configserver. To prevent that, you can specify spring.cloud.config.enabled=false. It won’t require configserver anymore but will still keep your Spring Boot application refreshable.

One more thing to mention is that if you are consuming values with @Value annotation, then corresponding classes need to be marked with @RefreshScope. Otherwise the annotated fields won’t be updated. There are no additional actions needed for either Environment or @ConfigurationProropeties with Spring Boot, though. This is another reason why you might prefer @ConfigurationProropeties to @Value.

Summary

I hope now that you see the full power of configuration management in Spring Boot and the variety of problems it solves out of the box. We went through very basic examples, with default settings applied whenever possible. Of course, Spring Boot is flexible and adjustable enough to handle far more sophisticated scenarios if needed. And the customization is often as easy as adding just a few more config options. However, I highly recommend following the best practices of coding and not complicating your configuration too much without good reason. This both saves your development time and is an investment for the future. Remember: the less code you write, the less you’ll need to maintain!

About the Author