An Introduction to Google IoT Cloud for IoT Projects

Google IoT Cloud

Introduction

The rapidly growing Internet of Things industry and the market of network-enabled microcontroller-powered devices creates some interesting challenges for developers. How to manage thousands of devices? How to collect status and health information? How to keep firmware up to date? 

As the number of connected devices grows, information flow increases. The vast amount of data coming from your IoT devices becomes more complex and difficult to manage. IoT development service companies working in the Internet of Things domain can solve this issue with components available from IoT Cloud. These components include AI elements that make decisions based on the data collected from the devices. 

Let’s review the possible solutions, but first, we need to understand the problem.

Why Do We Need a Cloud IoT Solution?

Imagine a dozen network-enabled small devices in your home and garden. What would we need to manage this small Internet of Things network?

  • We need to know the status of each device (battery level, memory load, configuration, etc.).
  • We need to get events from devices. This may be movement detections, temperature or light intensity changes, etc.
  • We need to send commands to each device to change its state or to control some switch or motor.
  • We need to be able to update the default configuration for each device, for example: to make it functional without network connection or change connection parameters.
  • We need to make power-efficient IoT devices that go into the long-term deep-sleep mode to save battery and wake up to perform actions or just to update the device status.
  • We need to be able to access our devices from anywhere through the Internet. 

All this activity should be reliable and secure, otherwise, devices may become uncontrollable.

What can we do to make your Internet of Things work?

1. We can set up an MQTT broker and local backend server that will work even if the uplink network connection is down. 

Google IoT Cloud

But there are some drawbacks:

  • Your backend computer may be unreliable. If it fails, your whole IoT network could become non-functional. 
  • Your local network may be behind the NAT and DDNS, which will cause problems when attempting to access your infrastructure from outside.
  • If you have more than one location for your IoT, you will need additional hardware
  • If your IoT devices are not in the local network range and using a GPRS/4G connection, your local infrastructure behind the NAT may be unreachable for such devices.
  • When IoT devices are in the deep-sleep mode, they become unreachable for external actors and their configuration can’t be changed remotely.
  • Security vulnerabilities may make your local server a target for hacker attacks.

2. We can set up our server on external hosting. This will also work. But then we should make everything ourselves including SSL certificates, server setup and maintenance, but there still may be security vulnerabilities and problems with server overloading when our network grows.

Google IoT Cloud

3. We can rely on an already existing Cloud infrastructure, of course. It’s reliable and secure, will likely survive under high data load, and is always available from anywhere as long as we are connected to the Network. It isn’t free, but for a small number of devices, it’s inexpensive. There are some drawbacks to an IoT Cloud platform, too. Let’s review them and try to find solutions.

Google IoT Cloud
  • IoT devices require an uplink connection to the Cloud, so when the connection is temporarily down, devices may become non-functional. This can be solved by adding offline functionality to your IoT devices, buffering events in device memory, or adding a local gateway that can be used as a backup server and event buffer while the uplink connection is down. And, of course, we can add a fallback 3G/4G modem to our local router and/or a GPRS modem to the IoT device.
  • IoT cloud server using SSL/TLS secure transport to IoT devices. This requires some computation and battery power, and we have to use more powerful controllers. But since we have energy-efficient 32-bit controller families nowadays, this need not be a constraint.

Why Google IoT Cloud?

An Android developer with a keen interest in IoT for many years, I was inspired by Android Things from Google and started developing for it on early Beta. It was a big disappointment for me and many other developers when Google closed the project. The whole concept changed from doing computations in IoT devices to mostly doing them in the Cloud when they presented Google IoT Cloud. 

At the time, I had several ESP32/ESP8266-based Home and Garden automation IoT projects, so why not give it a try? I’d been fighting with all of the local server and local network constraints described above, especially with deep-sleep-mode devices. So I decided to migrate all my devices to the Cloud and try out the IoT Cloud integration.

The advantages of Google IoT Cloud

One of the most popular IoT Cloud platforms, Google IoT Cloud can solve many problems for an IoT project: 

  • We can provision devices in the cloud and keep them in the Registry.
  • Devices may securely connect to the Cloud Pub/Sub, send status updates and events.
  • We can send commands to our devices from console, from SDK, or from stored function code.
  • We can update the configurations on devices using console, SDK, or stored function;
  • Device configuration updates and commands are saved in the Cloud until the device wakes up, then these changes are delivered. This solves the problem for deep-sleep-mode IoT devices.
  • We can use the power of IoT Google Cloud Platform to collect data, analyze it using stored functions or/and ML models, update our devices’ behavior and configurations depending on the incoming data, big data analysis, and ML models.

These capabilities make Google IoT Cloud a good entry point for connecting your devices to the intellectual backend with big data storage, ML data processing, and decision making.

Google IoT Cloud

What is Google Cloud IoT Core platform? It is an SSL-secured MQTT/HTTP broker that can be safely accessed from our IoT devices and used for bi-directional communications. Through the platform, devices can send events/updates to the Cloud IoT Core MQTT broker and subscribe to the command and configuration update topics. Then we can subscribe to the Google Cloud Pub/Sub service and use Google Cloud API or console to manage our IoT devices. So let’s do it!

How To Integrate Your IoT Device with Google IoT Cloud Platform

Workspace Preparation

First of all, we need to set up a new project on the Google Developer Console in your developer account, for example:

Google IoT Cloud

Now, we should switch to Google Cloud Platform Console and initialize Google Cloud IoT Core service:

Google IoT Cloud

Then we need to create a pair of Cloud Pub/Sub topic/subscription:

Google IoT Cloud

and

Google IoT Cloud

The same can be done from the command line with Google Cloud SDK:

gcloud pubsub topics create iot-pub --project=my-iot-project-274712
gcloud pubsub subscriptions create iot-sub --topic=iot-pub

NOTE: Please, make sure you replace “my-iot-project-274712” with your project ID.

Now, let’s create a device Registry we will provision our IoT device into:

Google IoT Cloud

We can use the command line as well:

gcloud iot registries create my-iot-devices \ --region=europe-west1 --event-notification-config=topic=iot-pub

NOTE: Please, pay attention to the Region you use for your nodes. It is important to use the same Region for all your IoT components and devices and it is important to choose the Region closest to your location.

IoT Devices Provisioning

Now everything is ready to start adding our IoT devices to Google Cloud IoT Core platform. We can continue using Cloud Console UI in your developer account, but from now on, we will switch to Google Cloud SDK because it may be called from the command line and will let us create an automated device provisioning script.

How to secure IoT device communications with encryption keys

To secure devices’ communications with Google Cloud IoT Core MQTT server we will use Elliptic Curve (EC) key pair. This key pair may be created for each particular device. Or different keys can be used for each device with Google Cloud IoT Core. But, for simplicity, we will generate a single private/public key pair:

openssl ecparam -genkey -name prime256v1 -noout -out ec_private.pem
openssl ec -in ec_private.pem -pubout -out ec_public.pem

Now, we need to extract a private key to insert it into an IoT device:

openssl ec -in ec_private.pem -noout -text

The output will look like this:

Private-Key: (256 bit)
priv:
    96:f9:6f:1d:ae:3a:e6:ec:e0:18:bb:a2:a3:5c:97:
    ef:84:60:fb:82:04:1f:67:0e:d6:cf:dc:5d:58:29:
    f0:56
pub:
    04:0d:62:1b:f0:58:4c:dc:4c:d2:11:86:8f:fd:79:
    24:52:50:b5:30:c1:1e:e7:89:e9:7e:2e:20:8a:1e:
    b8:ff:2b:d2:f6:64:f6:60:d7:6a:d9:a3:7c:c0:bd:
    b4:3f:c9:96:05:a4:98:47:6b:a3:8c:2b:f6:5e:ea:
    23:15:aa:f7:6c
ASN1 OID: prime256v1
NIST CURVE: P-256

And the key under “priv:” should be used in the IoT device. 

How to register a device on the registry

To provision our new device into the previously created device Registry, we can use Google Cloud SDK command line:

gcloud iot devices create my-iot-dev 0001 --region=europe-west1 \
        --registry=my-iot-devices \
        --public-key path=ec_public.pem,type=es256

Or we can do the same in the cloud console:

Google IoT Cloud

Ok. Let’s try it! 

At the moment, we have everything set up for publishing events in the Google Cloud IoT Core and pull it from Google Cloud Pub/Sub. 

First of all, we need to download the root SSL certificate to ensure that we connect to the Google Cloud domain. To do this, call:

wget pki.goog/roots.pem

Also, we need to generate a JWT (Java Web Token) key using our project ID and our ec_private.pem key to access the Google IoT cloud MQTT broker. 

Note: The JWT token we’re going to create is limited in time (60 minutes), so make sure you re-generate it just before making a test.

To generate the JWT token, we will use the following Python script:

#!/usr/bin/env python

import datetime

import jwt

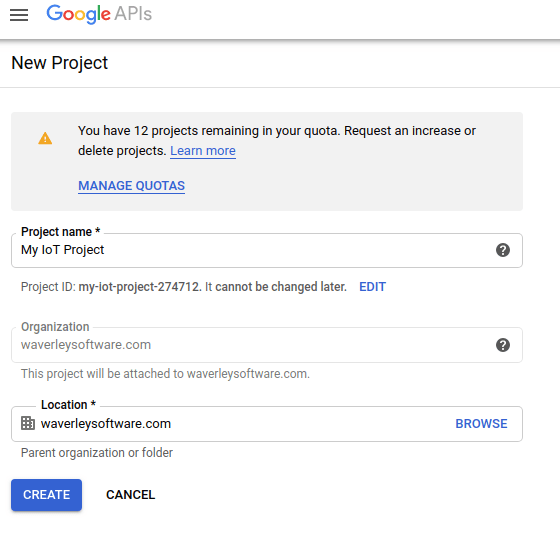
PROJECT_ID = 'my-iot-project-274712'
SSL_PRIVATE_KEY_FILEPATH = 'ec_private.pem'
SSL_ALGORITHM = 'ES256'


def create_jwt(project_id, private_key_file, algorithm):
    """Creates a JWT (https://jwt.io) to establish an MQTT connection.
        Args:
         project_id: The cloud project ID this device belongs to
         private_key_file: A path to a file containing either an RSA256 or
                 ES256 private key.
         algorithm: The encryption algorithm to use. Either 'RS256' or 'ES256'
        Returns:
            An MQTT generated from the given project_id and private key, which
            expires in 60 minutes. After 60 minutes, your client will be
            disconnected, and a new JWT will have to be generated.
        Raises:
            ValueError: If the private_key_file does not contain a known key.
        """

    token = {
        # The time that the token was issued at
        'iat': datetime.datetime.utcnow(),
        # The time the token expires.
        'exp': datetime.datetime.utcnow() + datetime.timedelta(minutes=60),
        # The audience field should always be set to the GCP project id.
        'aud': project_id
    }

    # Read the private key file.
    with open(private_key_file, 'r') as f:
        private_key = f.read()

    print('Creating JWT using {} from private key file {}'.format(algorithm, private_key_file))

    return jwt.encode(token, private_key, algorithm=algorithm)


print('JWT token:')
print(create_jwt(PROJECT_ID, SSL_PRIVATE_KEY_FILEPATH, SSL_ALGORITHM))

Note: Do not forget to replace PROJECT_ID = ‘my-iot-project-274712’ by your project ID.

Save it in my_gwt_gen.py and call by:

python my_gwt_gen.py

The output will look like this:

JWT token:
Creating JWT using ES256 from private key file ec_private.pem
eyJhbGciOiJFUzI1NiIsInR5cCI6IkpXVCJ9.eyJpYXQiOjE1ODczMDU3MTUsImF1ZCI6Im15LWlvdC1wcm9qZWN0LTI3NDcxMiIsImV4cCI6MTU4NzMwOTMxNX0.S7aLDZ2X97TPbkAXQgd_Y1JYqPxnjSXAxbTS-Q15Bvw51nDXxHvVzGDvcIXZCi8vqqKVNh1vk7jPaOzSKyNqhA

Let’s make a quick test using mosquitto_pub with our settings. Copy-paste the JWT token generated by my_gwt_gen.py into the next script after the “–pw” line:

mosquitto_pub \
--host mqtt.googleapis.com \
--port 8883 \
--id projects/my-iot-project-274712/locations/europe-west1/registries/my-iot-devices/devices/my-iot-device0001 \
--username unused \
--pw "eyJhbGciOiJFUzI1NiIsInR5cCI6IkpXVCJ9.eyJpYXQiOjE1ODczMDQ0NTYsImF1ZCI6Im15LWlvdC1wcm9qZWN0LTI3NDcxMiIsImV4cCI6MTU4NzMwODA1Nn0.lG-oXPujc6OjqD6_vgT5pkPN49huOfgDVm2KFYn9cMfyi4LVqGv80xzRAedrUc2M5GOVDoI8rI49uVR4l8vEng" \
--cafile ./roots.pem \
--tls-version tlsv1.2 \
--protocol-version mqttv311 \
--debug \
--qos 1 \
--topic /devices/my-iot-device0001/events \
--message "Temp:10"

And call the script. The output will be similar to the following:

Client projects/my-iot-project-274712/locations/europe-west1/registries/my-iot-devices/devices/my-iot-device0001 sending CONNECT
Client projects/my-iot-project-274712/locations/europe-west1/registries/my-iot-devices/devices/my-iot-device0001 received CONNACK (0)
Client projects/my-iot-project-274712/locations/europe-west1/registries/my-iot-devices/devices/my-iot-device0001 sending PUBLISH (d0, q1, r0, m1, '/devices/my-iot-device0001/events', ... (7 bytes))
Client projects/my-iot-project-274712/locations/europe-west1/registries/my-iot-devices/devices/my-iot-device0001 received PUBACK (Mid: 1, RC:0)
Client projects/my-iot-project-274712/locations/europe-west1/registries/my-iot-devices/devices/my-iot-device0001 sending DISCONNECT

As you can see, the mosquitto_pub connected to the Google IoT Cloud MQTT broker and successfully published the “Temp:10” message on behalf of “my-iot-device0001” IoT device. 

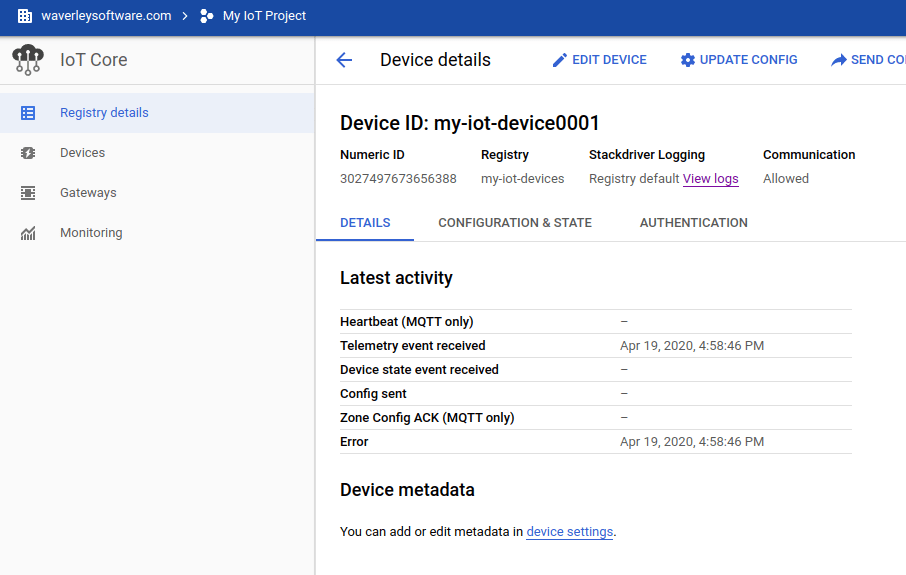
Let’s check it in the cloud:

Pull the Cloud Pub/Sub topic:

Google IoT Cloud

The message is there!

And the device itself:

Google IoT Cloud

Look at the “Telemetry event received” date. Our event is there.

Conclusion

Now we are prepared to leverage the Google Cloud IoT services in our IoT projects. We know how to set up a Cloud environment, create device Registry, create security keys, and provision devices manually as well as by using the automated script.

We know how to generate JWT tokens and how to publish telemetry messages to the Google Cloud Pub/Sub. And we can proceed to the Next Step.

What’s Next?

We will do a lot of things together. The next articles will cover:

  • How to make a C++ library for connecting to Google IoT Cloud (spoiler: the library is available here).
  • How to create Google Cloud stored functions to save IoT telemetry in the InfluxDB storage.
  • How to make an IoT Management mobile application using Flutter and Google IoT Cloud API.
  • How to notify your mobile application by IoT events using Firebase Cloud Messaging.

Stay tuned. You won’t want to miss what’s ahead! 

About the Author

Call to action 0Call to action 1Call to action 2Call to action 3Call to action 4Call to action 5Call to action 6Call to action 7Call to action 8Call to action 9

Looking for IoT Developers?

contact us